Lesson 6 – micro:bit Display

Python Concepts

For loops

Teacher Materials

Get Access

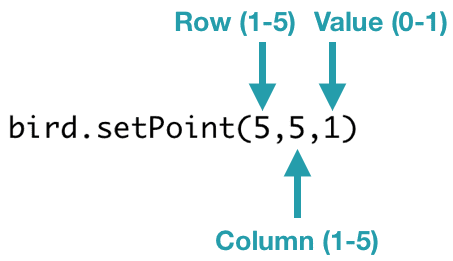
In the last lesson, you learned to use while loops to repeat actions. In this lesson, you will use a different kind of loop, the for loop. You will use this loop with a new Finch output, the micro:bit display. There are 25 tiny lights called LEDs (light-emitting diodes) that are arranged in a 5 by 5 grid on the micro:bit in the Finch tail. You can write programs that use these LEDs to make letters and simple pictures.

Printing to the micro:bit

To write letters and numbers on the micro:bit, use the print() method. This method takes a string parameter. The string must have 15 or fewer characters and should contain only letters and numbers. The print() method displays the string on the micro:bit LED array one letter at a time. For example, the code below shows the letter ‘H’ then the letter ‘i’ on the micro:bit. There is a pause after the print() command to give the program time to finish displaying the word before moving on to the rest of the program.

bird.print("Hi") # Print Hi on micro:bit display 
sleep(1)

Exercise 1

Ask the user for their name. The program should then display “Hi” and then the user’s name. Some names may have 10-12 letters, so make sure your program waits long enough to print a long name.

Setting Individual LEDs

To turn individual micro:bit LEDs on or off, use the setPoint() method. This method takes three parameters. The position of the LED is given by the row and column parameters, which should both be between 1 and 5. The third parameter is the value of the LED, which must be 0 (off) or 1 (on).

bird.setPoint(5,5,1) 
 The setPoint() function takes three parameters. The first is the row from 1 to 5. The second is the column from 1 to 5. The third is a value of 0 or 1 that indicates whether the light should be off or on.

Exercise 2

Try out this code. It should turn on the LEDs at the corners of the micro:bit display for one second. Then modify this code to light up the LEDs along both diagonals of the display.

bird.setPoint(1,1,1) # Turn on all the corners 
bird.setPoint(1,5,1) 
bird.setPoint(5,1,1) 
bird.setPoint(5,5,1) 
sleep(1) 
bird.stopAll()

For Loops

To create more complicated effects on the micro:bit display, you can use a for loop. In the last lesson, you used a while loop, which repeats the statements inside it as long as a Boolean expression is true. A for loop, on the other hand, repeats the statements inside it a specific number of times. For example, the code below will make the Finch’s beak blink on and off five times.

for i in range(5): # Repeat 5 times 
bird.setBeak(0,100,0) # Beak Green 
sleep(0.2) 
bird.setBeak(0,0,0) # Beak Off 
sleep(0.2)

In Python, range(5) produces a list of numbers from 0 to 4: [0,1,2,3,4]. The list contains all the numbers between 0 and the parameter of the range() function. The list includes 0 but does not include the parameter. 

The for loop creates a variable named i. The for loop sets this variable equal to the first value on the list (0) and then executes the four indented lines of code within the loop. These four lines of code make the beak blink green once. Then the program goes back to the top of the for loop, sets i equal to the next number in the list (1), and executes the four lines of code within the loop, blinking the beak again. This process continues until i is equal to 4, the last number in the list. When i is 4, the program executes the lines of code inside the loop and then moves on to whatever unindented code follows the for loop.

Exercise 3

Use a for loop to make the Finch move forward and backward six times.

Exercise 4

What do you think this code will do? Make a hypothesis, and then test it out.

for i in range(5): 
bird.setPoint(i+1,i+1,1) 
sleep(.5) 
bird.stopAll()

Exercise 5

Write a program that gradually draws a square on the micro:bit display. Hint: You will need to use multiple for loops.

Displaying Patterns

To display different patterns on the micro:bit, you can also use the setDisplay() method. This method sets the LED array of the micro:bit to display a pattern defined by a list of length 25 (you will learn more about lists in Python in a later lesson). Each value in the list must be 0 (off) or 1 (on). The first five values in the array correspond to the five LEDs in the first row, the next five values to the second row, and so on. For example, this code lights up the top and bottom rows on the micro:bit display. This code shows the numbers for each micro:bit row on a different line. This isn’t required in Python, but it makes the code easier to read.

bird.setDisplay([1,1,1,1,1,0,0,0,0,0,0,0,0,0,0,0,0,0,0,0,1,1,1,1,1]) 
sleep(1) 
bird.stopAll()

Exercise 6

Try out the code above. Then modify the code to display a smiley face on the micro:bit display. 

Exercise 7

Use a for loop to blink the micro:bit display between two different patterns. If you blink quickly between different patterns, you can create simple animations like a bunny hopping up and down.

Exercise 8

Write a program to make the Finch move in a triangle, pentagon, or other shape. Your program should do the following:

  • Ask the user for the number of sides.
  • How many turns will the Finch need to make to return to its starting position? Compute the angle for each turn. (Hint: The Finch must turn a total of 360°.)
  • Use a for loop to draw the shape.
  • As the Finch draws each side, the micro:bit should display the number of the side it is drawing. (Hint: Use str() to convert a number to a string.)

For an added challenge, give the user an error if they enter a number less than 2.

Back to Top