This last Finch lesson will focus on building graphical user interfaces for your Finch. For example, the program below will create a slider that controls the speed of the Finch’s left wheel.
Register to receive free access to all teacher materials.


Basics of Tkinter
This last Finch lesson will focus on building graphical user interfaces for your Finch. For example, the program below will create a slider that controls the speed of the Finch’s left wheel.
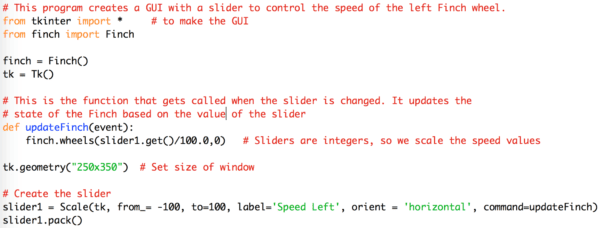
Try out the program above, and then add a second slider to control the speed of the Finch’s right wheel.
By now, you have probably realized that the Finch doesn’t turn off automatically when you close the GUI window. Add a “Quit” button that will turn off the Finch and close the window.
Add three more sliders to your GUI to enable the user to control the red, green, and blue values for the Finch’s beak.
You can even use the Finch as a controller for your own video game! The rest of this lesson will focus on creating a starter program that you can then customize to make your own game.
Start your project by creating a canvas that contains a circle controlled by the Finch.
Now that you can use the Finch to control one circle on the screen, add a second one that moves randomly.
Now you can use the first circle to chase the second circle around the screen. Starting from this simple game, create your own game with Tkinter and the Finch! You can be as creative as you like, but if you need a starting point, consider the following: