Print

Snap!Sensing with the Finch

Lesson Key

Lesson key available for teachers.   Get Access

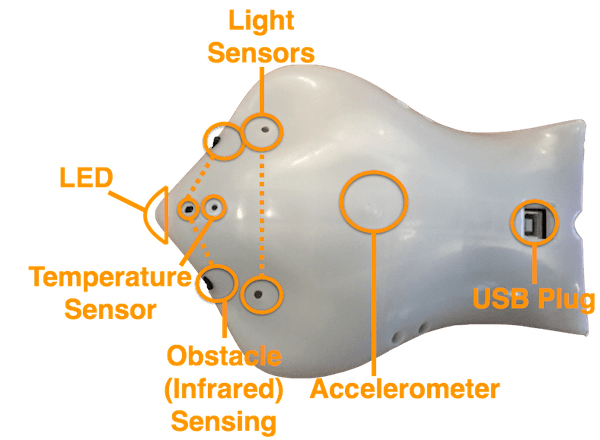
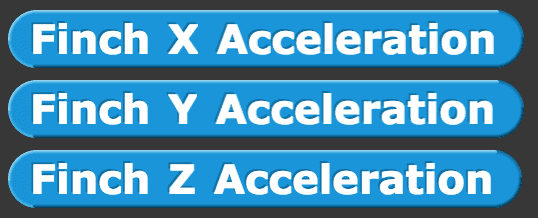
In the first lesson, you learned to use the Finch outputs: the motors, lights, and buzzer on the Finch. The Finch also has sensors that provide input to the robot. A sensor makes measurements and sends them to the program that the Finch is running. The program can use the sensor information to set outputs or make a decision. The Finch has two light sensors, an acceleration sensor (accelerometer), two obstacle sensors, and a temperature sensor.

The sensor blocks for the Finch are at the bottom of the Sensing menu in Snap!. For example, the Finch Left Light Sensor and the Finch Right Light Sensor blocks can be used to measure the values of the two light sensors. Each of these blocks has a value from 0 (no light) to 100 (maximum light).

Exercise 1:

Drag a light sensor block into the Scripts area. Click on the block to see the current value of the sensor. Next, cover the light sensor with your hand and click on the block again. You should see the value of the light sensor change. What is the value of the block when you shine a flashlight on the sensor?

Creating a Variable

To see the value of a sensor change, it is helpful to create a variable. A variable is just a name that represents a value. You will now create a variable named “left light” that will hold the value of the left light sensor and display that value on the screen.

First, go to the Variables menu. Then click Make a Variable.

The Variable name window will appear. Call the variable “left light” and click OK.

You will notice that the Variables menu looks different now. It contains some blocks that you can use to change the value of your variable. Also, the value of the variable is shown in the top-left corner of the stage.

We want to set the value of our variable equal to the value of the left light sensor. To do this, we can use the set to block. We will place this block inside a forever loop to continually set the variable to the value of the sensor.

Exercise 2:

Run the script below and watch the value of the variable change as you cover and uncover the light sensor. Add a variable for the right light sensor and modify your program so that both variables change as you cover and uncover the Finch.

Following the Light

You can use the sensor blocks to make the robot respond to its environment. For example, you can make the robot follow a flashlight using the script shown below. The Move Finch block set the speed of the robot using the values of the light sensors, and the forever loop repeats this action over and over.

Exercise 3:

Use a flashlight to try out the program shown below. Why is the speed of the left motor controlled by the right sensor? What happens when the speed of the motor is controlled by the sensor on the same side?

Using Math with the Temperature Sensor

There are also Finch blocks that can be used for measuring temperature.

Exercise 4:

Create a variable named “temperature” that is equal to the value of the temperature sensor. What is the temperature in your room in Celsius? Can you raise the temperature reading of the sensor?

But what if you want to know the temperature in Fahrenheit instead? You could, of course, use the Finch Temperature Fahrenheit block, but we will demonstrate how to use this formula to do some math in Snap!.

In the Operators menu, Snap! contains blocks that you can use to do arithmetic.

Exercise 5:

You can place arithmetic blocks inside one another. When you do this, the operation in the innermost block will be performed first. In the expression below, the 2 and 4 will be added together first, and then the result will be multiplied by 10. What will be value of this expression be? Make a hypothesis and then test it in Snap!. Remember, you can click on a block to find the value of the block.

Exercise 6:

Fill in the blanks below to make your temperature variable hold the temperature in Fahrenheit calculated from the Celsius temperature measured by the Finch. Then compare this to the value of the Finch Temperature Fahrenheit block.

Moving Sprites with the Accelerometer

The last Finch blocks that we will use in this lesson measure acceleration. These blocks measure how much the Finch is tilted (or changing its speed). When the Finch is sitting on a flat surface, these blocks will not change. There are three different blocks because the Finch can measure tilt in three different directions. The value of each block is a decimal number between -1.5 and 1.5.

Exercise 7:

Create three variables. Use the program below to continually change these variables to the values of the acceleration blocks. Tilt the Finch in different directions. What type of tilt makes each variable change?

You can use the accelerometer to move a sprite around the stage in Snap!. This will enable you to make your own video games with the Finch as the controller!

First, click on the small sprite picture in the lower-right portion of the screen. This will create a new sprite in Snap! To get rid of the a sprite, right-click on it in this area and select delete.

You can also give a sprite a costume, by clicking on File and then Costumes. This will open Snap!’s Costumes window. Select a picture you like and click Import.

Sprite in Scratch move on a coordinate grid. You can see this grid by clicking on the Stage icon in the Sprites area. Then go to File and then Backgrounds . All the way at the bottom is a background called “XY Grid.” Select it and click Import.

You should see a background that looks like this. The x -value of a sprite can be between -240 and 240 in Scratch, and the y -value can be between -180 and 180.

You can use the go to block in the Motion menu to send a sprite to a particular point.

Exercise 8:

What will your sprite do when you run this program? Make a hypothesis, and then try it out.

Exercise 9:

Declare another variable named xPaddlePosition. You will use this variable to determine the x -position of the paddle on the stage. As you tilt the Finch, the value of the y -acceleration is between -1 and 1. What number will you need to put in the blank below to make the paddle move from -240 to 240?

Exercise 10:

Place a go to block at the bottom of your forever loop. Use this block to continually set the x -position of the paddle sprite to xPaddlePosition. The y -coordinate for the sprite can be -180; this is the bottom of the stage. When you run your script, you should be able to move your sprite by tilting the Hummingbird!

Exercise 11:

You will notice that when you tilt the Finch to the left, the paddle moves to the right. When you tilt the Finch to the right, the paddle moves to the left. How can you adjust your code to fix this problem?

Now that you can control a sprite with the Finch, you can add other elements to create your own video game! For more details, see the Finch Pong I activity; you have already done the first part of this activity.