Arduino: Lessons for Hummingbird Arduino

These modules will help you learn to write programs in Arduino to control the Hummingbird. You may be new to the Hummingbird, or you may have already worked with the Hummingbird using Snap!. Arduino is a text-based programming language where programs loaded onto your Hummingbird board via a USB cable. After the program has been loaded onto your Hummingbird, you can unplug the USB cord, and the program will continue to run!

Keys Available

Keys are available to educators.

Get Access

Getting Started

Start by watching the video shown below.

The video will show you how to connect the Hummingbird outputs, the lights and motors that make a robot do something, and the Hummingbird inputs, the sensors that a robot can use to gather information about its environment.

Get The Comic!

Before you start programming, you will need to have the Arduino programming language installed; instructions are available here. Your Hummingbird board will need to be in Arduino mode; instructions are available here.

Preparing to Use Arduino

Open the Arduino programming language.

Set your board type to Hummingbird Duo by selecting Tools, then Board, and then Hummingbird Duo.

Set the Arduino’s serial port. Go to Tools->Port and select the correct port; if there are two options, it is almost never the first option.

To create a new Arduino file for Hummingbird, go to File/Examples/Hummingbird/BlankSlate.

The BlankSlate file creates a template that has everything you need to write a Hummingbird Arduino program. It includes the Hummingbird library, declares a Hummingbird variable, and sets up two functions named setup() and loop().

The setup() function contains those things that happen once when your program starts. This function must call hummingbird.init() to setup the Hummingbird to run your Arduino code.

The loop() function is where you will do most of your work in Arduino. Everything inside this function will be repeated over and over as long as your Hummingbird has power.

This sample program also contains some comments to help you understand it. Everything on a line that follows “//” is a comment. Comments do not affect how the program runs. They are there to provide information to the programmer. It is good programming practice to comment you code so that another programmer (or you at a later date) can understand it.

Saving Your Work

It is very important to save your work often! Otherwise, you might lose something important. To save a new program in Arduino, select File/Save As. Give your project a name and then click Save. Once your project has a name, you can save it using File/Save.

Using the Hummingbird Outputs

First, you will learn to use the lights, which are also called LEDs. The Hummingbird kit contains two types of LEDs, single color LEDs and tri-color LEDs. Single color LEDs have two wires, while tri-color LEDs have four wires.

Module 1: LEDs

Single Color LEDs

A single color LED can be connected to one of four ports labeled “LEDS” on the Hummingbird board. Since you have four ports, you can connect up to four single color LEDs. The black LED wire should be connected to the ‘-’ terminal, while the colored wire should be connected to the ‘+’ terminal.

Attach a single color LED to port 1.

To use the single color LED, you will call the setLED() method. This method requires two numbers, or parameters. The first parameter is the number of the Hummingbird port to which the LED is attached (1-4). The second parameter is the intensity of the LED. This is a number between 0 and 255. 0 means that the LED is off, and 255 means that the LED is at maximum brightness.

Add the setLED() method to the loop() function in your program. You must call this method as hummingbird.setLED(), and you must have a semicolon at the end of the line of code.

Click on the Upload button. Monitor the status of the upload at the bottom of the Arduino window. When the program has finished uploading, it should say “Done uploading.” At this point, the LED in port 1 should be on.

Exercise 1.1

Change the intensity of the LED from 255 to 0 and upload the program again. This should make the LED turn off. Try out other numbers between 0 and 255 to explore the different levels of brightness that are possible.

Adding Delays

To blink an LED in Arduino, we need the setLED() method and also the delay() function. The delay() function pauses the program for an amount of time given in milliseconds.

Add a delay() function to your program and set it to pause the program for half a second. Next, add another setLED() method and another delay() function to turn the LED off for half a second.

Now your program will repeatedly turn the LED on for half a second and then turn it off for half a second. This should make the LED blink! Upload the program to give it a try.

Once you have uploaded your program, the LED should continue to blink even when you unplug the USB cord. This is because your program is actually running on the microcontroller in the Hummingbird board! However, the Hummingbird does need power, so you will still need the power adapter or a battery pack. As long as the board has power, the program will continue to run until you upload a new program to replace it.

Exercise 1.2

Connect a second LED to your Hummingbird. Modify your program so that the second LED is off when the first is on and on when the first LED is off. Remember to connect the Hummingbird to the computer with the USB cord to upload your new program.

Building Tip

LEDs are quite small, but you can use a styrofoam ball to diffuse the light. This will make the light appear larger.

Tri-Color LEDs

A tri-color LED can be attached to one of the two ports labeled “TRI-COLOR” on the Hummingbird board. The four wires of the tri-color LED are red, green, blue, and black. The black wire should be connected to the ‘-’ terminal. The red wire should be connected to the ‘R’ terminal, the green to the ‘G’ terminal, and the blue to the ‘B’ terminal.

The tri-color LED actually has three tiny lights inside it. One is red, one is green, and one is blue. This is important for programming the tri-color LED. The setTriColorLED() method requires four parameters. The first parameter is the number of the port to which the tri-color LED is attached (1 or 2). The other parameters control the amount of red, green, and blue light from 0 to 255. As an example, the code below makes a tri-color LED in port 1 turn green.

Exercise 1.3

What do you think this code will do? Make a prediction and then try it out. How do you turn the tri-color LED off?

Exercise 1.4

Make a tri-color LED blink on and off in your favorite color. The LED should blink at least twice each second,  and it should blink evenly – in other words, it should be off for the same amount of time that it is on.

Module 2: Loops with Variables

The main loop() function in Arduino is great for blinking an LED, but another type of loop can be helpful to get a fading effect. This loop is called a for loop. A for loop repeats whatever is inside it a certain number of times. Try out this program and see your LED repeatedly increase in brightness.

The for loop creates a variable, which is a name that represents a value. Here, the variable is named i. The for loop uses i to keep track of how many times the commands inside the loop have been repeated.

The logic of the loop is shown in this flowchart. When the program reaches the for loop, it sets the variable i equal to 0 and then checks if the value of i is less or equal to 255. If it is, the lines of code inside the curly braces are executed. These two lines of code set the red value of the tri-color LED to i and then wait 10 milliseconds. Then the program returns to the top of the loop and increases the value of i by 1; this is the i++ part of the for loop. It checks again whether i is less than or equal to 255. If it is, the code inside the curly braces is executed. This process continues until the test fails. When i is not less than or equal to 255, the loop ends and the program moves on to whatever code is below it.

Exercise 2.1

Connect a second LED and modify your program so that one LED decreases in intensity as the other increases. You will need to use subtraction.

Exercise 2.2

Write a program to make the tri-color LED repeatedly transition from red to blue.

Module 3: Motors

The Hummingbird kit works with three different kinds of motors: vibration motors, servo motors, and gear motors.

Vibration Motors

A vibration motor can be attached to one of the two ports labeled “VIBRATION” on the Hummingbird board. It does not matter which wire is attached to ‘+’ and which is attached to ‘-.’

The setVibration() method is used to control the vibration motor. This method requires two parameters. The first is the port attached to the vibration motor (1 or 2) and the second is the intensity of vibration from 0 to 255. 0 means no vibration, and 255 means maximum vibration.

Exercise 3.1

Write a program that repeatedly turns both a vibration motor and a single color LED on for four seconds and then off for four seconds.

Building Tip

Small, very light items such as googly eyes can be attached to a vibration motor so that they move when the motor vibrates.

Servo Motors

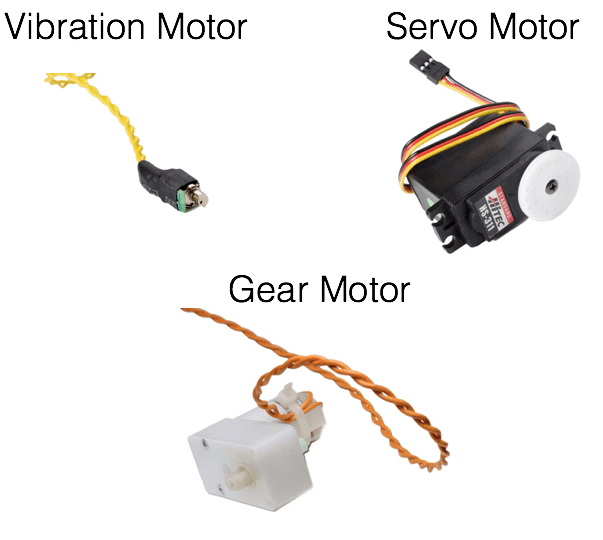
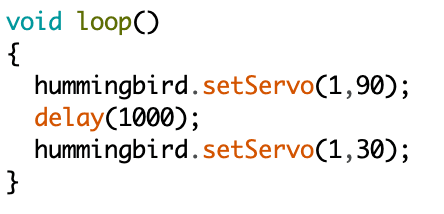
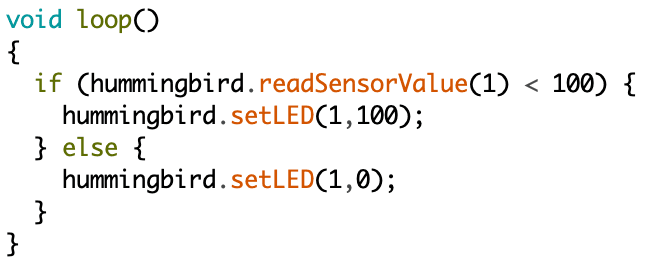
A servo motor is a motor that moves to a particular angle. The Hummingbird servo motor can rotate to any angle from 0° to 180°.

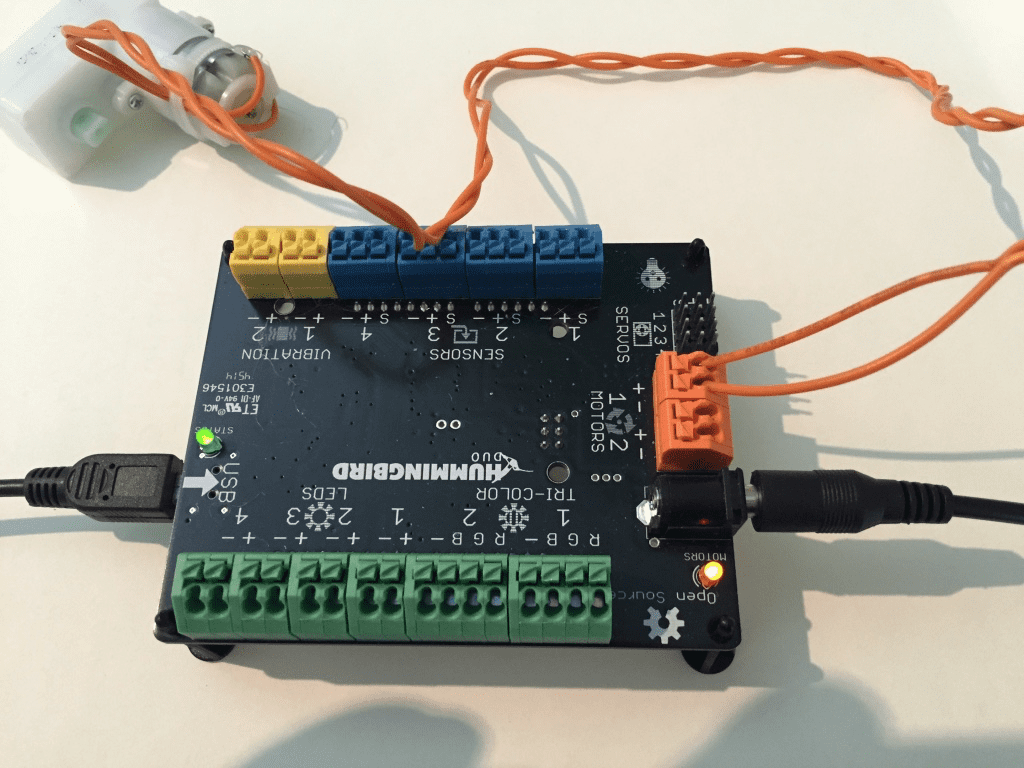
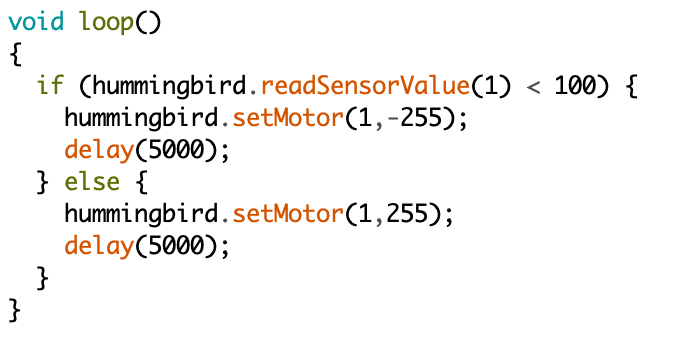
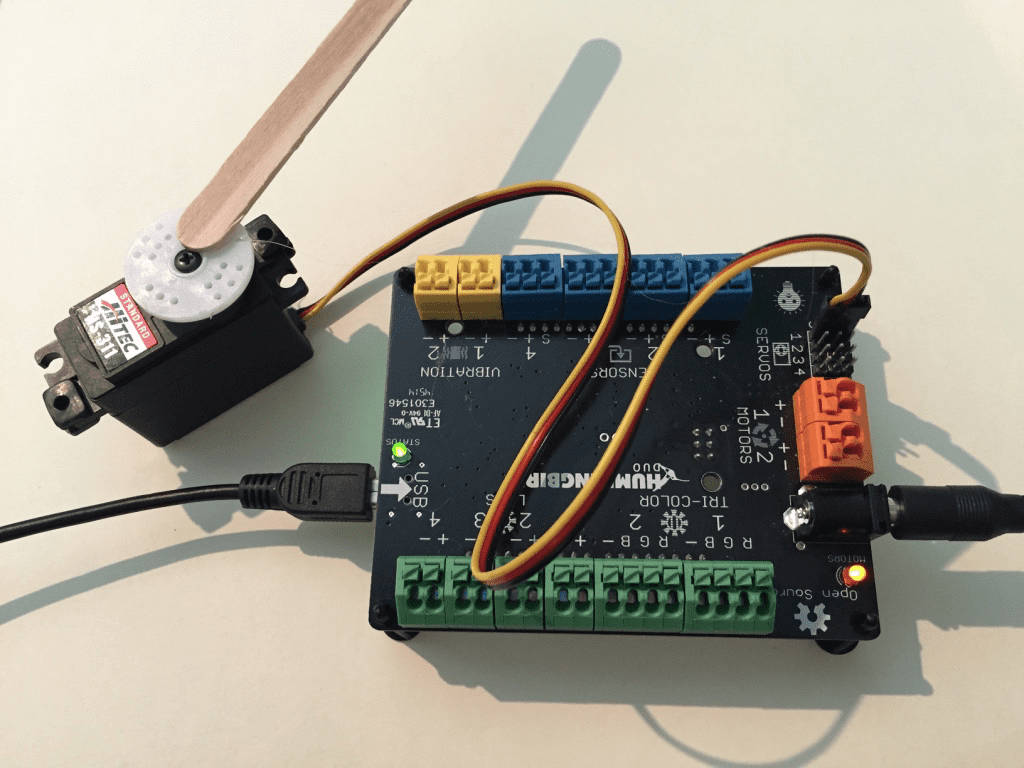
Important Note: When using the servo motor, you must also use the AC power adapter (or a battery pack). Otherwise, the Hummingbird board will not have enough power to run the motor.

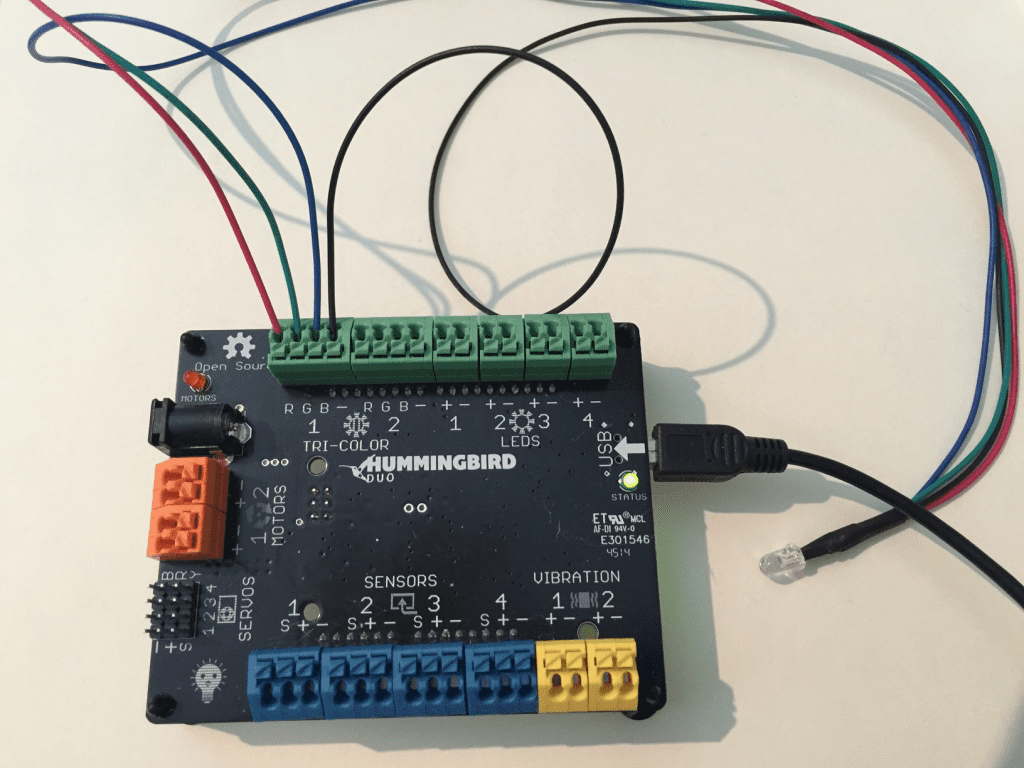
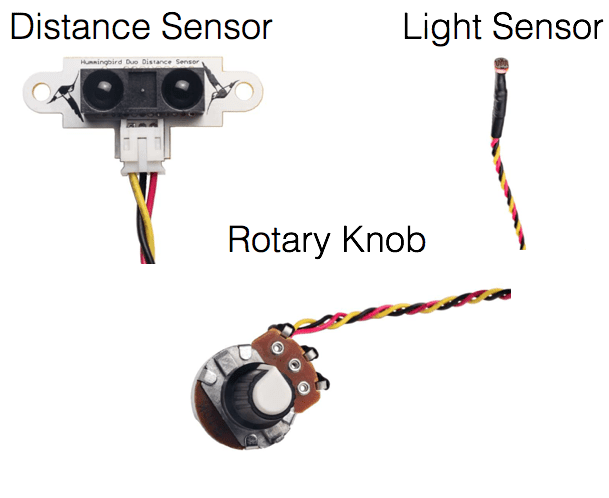
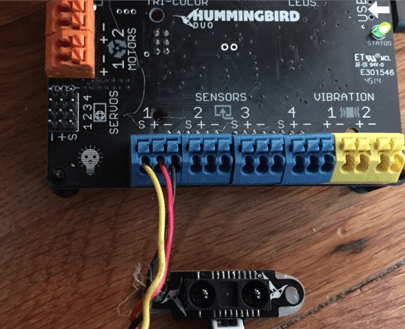
The servo motor has a small plug. This plug should be connected to one of the four sets of pins in the “SERVOS” section of the Hummingbird board. Each set of three pins is one servo port. The black wire should be connected to the ‘-’ pin, the red wire to the ‘+,’ and the yellow wire to the ‘S.’

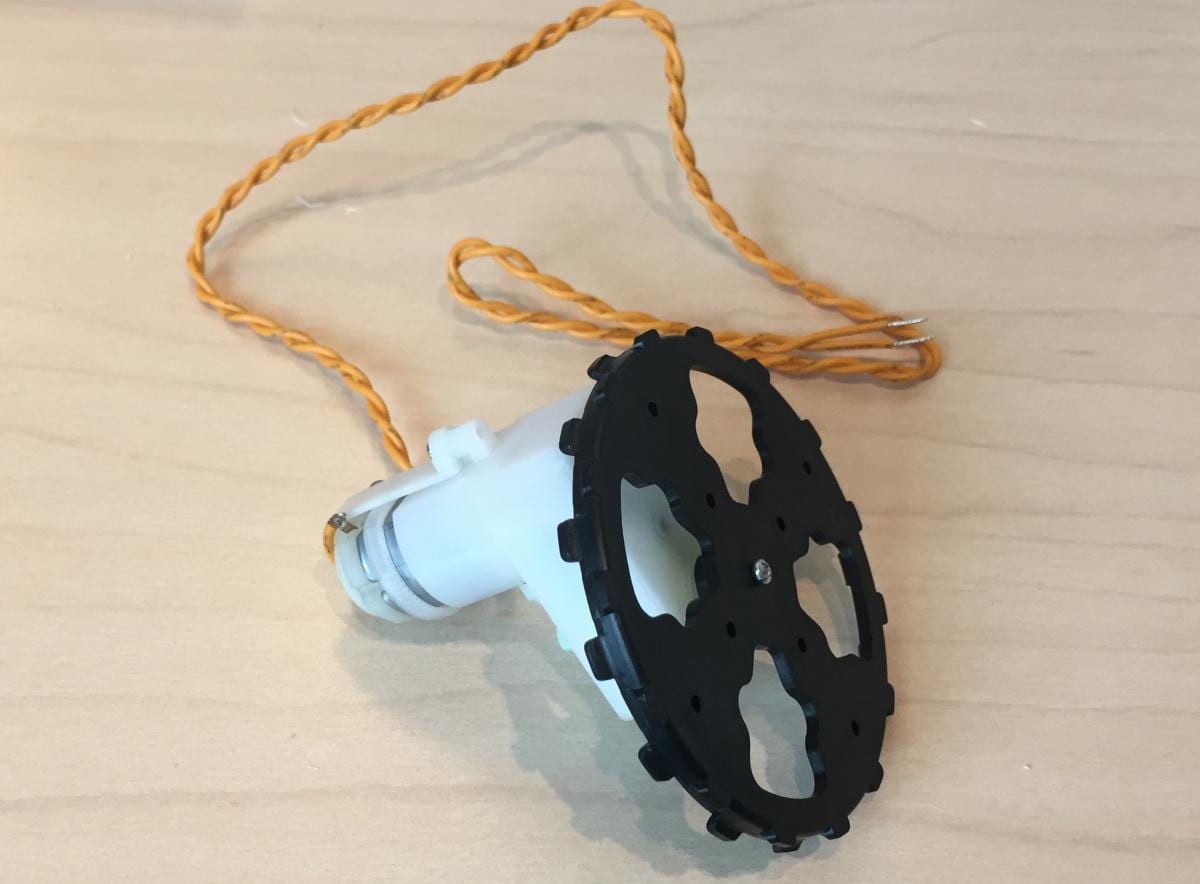
Use hot glue to attach a popsicle stick to the white plastic circle on the servo motor. This will help you to see the movement of the servo motor more easily. If you don’t want to use hot glue, you can tape a feather to the plastic circle.

The setServo() method is used to move the servo motor. It requires two parameters. The first parameter is the port attached to the servo (1-4) and the second is the angle (0° to 180°).

Exercise 3.2

The code below is supposed to move the servo motor repeatedly to two different angles, but there is a problem. Try out this code, and figure out how to correct it.

Exercise 3.3

Write a program that slowly moves the servo back and forth between 0° and 180°.

Building Tip

Before you start building with a servo, always set it to 90°. This will make sure that the servo can move both left and right once it is attached to your robot.

Gear Motors

The gear motor can be attached to either of the ports labeled “MOTORS” on the Hummingbird board. It does not matter which wire is attached to ‘+’ and which is attached to ‘-.’ When using the gear motor, you must also use the AC power adapter (or a battery pack).

Important Note: Do not cut the zip ties off your motors. Without the zip tie, the wires may break off the motor.

The setMotor() method is used to control the gear motor. This method requires two parameters. The first is the port attached to the motor. The second is the motor speed. This number can be any whole number from -255 to 255. As an example, this code repeatedly turns the motor on for two seconds and then off for two seconds.

Exercise 3.4

Use a small screwdriver to attach a wheel to the motor so that you can see it move more easily (or just place it on the motor without using a screw). Try several speeds between 0 and 255. Describe how the speed affects the motor. Try several negative speeds. What does it mean for the speed to be negative?

Important Note: You may notice that your motor rotates clockwise for positive numbers, while your neighbor’s rotates counterclockwise for the same number. This just means that you and your neighbor chose ‘+’ and ‘-‘ differently when you plugged in your motors. Either way is fine!

Exercise 3.5

Write a program that sets the speed of the motor to a random value every three seconds. You will need to use the random() function. As an example, the code shown below generates a random integer between 0 and 10 and stores it in a variable named randomNum. This variable can then be used anywhere in Arduino that a whole number can be used. What should the limits of the random number be to set the speed of the motor?

Exercise 3.6

Are you ready to use all the Hummingbird lights and motors? Write a program that includes the following:

  • At least three LEDs
  • At least two different kinds of motors
  • At least one for loop

Using the Hummingbird Inputs

The Hummingbird LEDs and motors are output devices. Programs send commands to these devices to make something happen. The Hummingbird sensors, on the other hand, are input devices. They send information to the program. The program can use this information to control a light or a motor or make a decision.

All of the sensors are attached to the Hummingbird in the same way. A sensor can be attached to any one of the four ports labeled “SENSORS.” Each sensor has a red wire, a black wire, and a yellow wire. The red wire should be connected to ‘+,’ the black to ‘-,’ and the yellow to ‘S.’

Module 4: Rotary Knob

The rotary knob is a sensor that measures how much you have turned the knob. To read the value of a sensor in Arduino, you will readSensorValue() method. This method requires only one parameter, the port of the sensor. This method measures a value and passes that value back to the program. In computer science, passing a value back to the program is called returning a value.

Printing to the Screen

To better understand this sensor, it is helpful to display its value on the computer screen so that you can see the value change. To do this, you need to add a line of code to the setup() function. This prepares Arduino to print values to a window called the serial monitor.

Once you have set up the serial monitor, you can print values using Serial.println().

Attach a rotary knob to sensor port 1 and upload this program to the Hummingbird. To see the values that the program is printing, click on the Serial Monitor button in Arduino.

A window will pop up on your screen. In this window, the value of the rotary knob is being printed over and over.

Exercise 4.1

Turn the rotary knob back and forth. What are the maximum and minimum values of this sensor?

Important Note: The Hummingbird can only print the sensor values to the computer screen when it is connected to the computer via the USB cable. You must close the serial window before you can upload a new program to the Hummingbird.

Controlling Lights and Motors

You can use the rotary knob to set the brightness of an LED. Since the maximum value of the rotary knob sensor is larger than the maximum possible brightness for an LED, you need to divide the sensor value by 4 to get a number in the range 0-255.

Exercise 4.2

Use the rotary knob to control the angle of the servo from 0° to 180°. What number do you need to divide the sensor value by to produce an angle in this range?

Exercise 4.3

Use the rotary knob to control the color of a tri-color LED. When the rotary knob is at its minimum, the LED should be red. When the rotary knob is at its maximum, the LED should be blue.

Module 5: Light Sensor

The light sensor measures the amount of light around it. Like the rotary knob, you can find its value with the readSensorValue() method. This value will be between 0 and 1023.

Exercise 5.1

Attach the light sensor to the Hummingbird board and print the value of the sensor to the screen.  Measure the amount of light in your room, and then measure the value of the light sensor when you cover it with your hand. Record these values; you will need them later.

Exercise 5.2

Use the light sensor to control the speed of a gear motor. For an extra challenge, make sure the motor moves in both directions (i.e., clockwise for some sensor values and counterclockwise for others).

Making a Decision

Sensors can enable your robot to make a decision. For example, suppose you want to turn on a light if the room is dark. You can use an if-else statement to do this.

For example, this code will turn on an LED if the value of the light sensor is less than 100. The keyword if is followed by a comparison, bird.readSensorValue(1) < 100. This comparison is a Boolean expression, which means that it is either true or false. If the comparison is true, the program runs all the code inside the curly braces that follow the Boolean statement. If the comparison is false, the program runs all the code inside the curly braces that follow the keyword else. Then the program moves on to whatever code is next in the program.

The value that a test uses to make a decision is called the threshold. In the sample program, the threshold is 100. If the value of the light sensor is less than this threshold, the program decides that it is dark.

Exercise 5.3

Try out the sample program shown above. You will need to choose a threshold that is appropriate for the lighting in your room. Take the average of the two values you recorded in Exercise 5.1; this should be an appropriate threshold.

Exercise 5.4

Write a program that blinks a red LED and moves a servo motor when a bright light is detected. When there is no bright light, the LED should be off and the servo should not move.

Exercise 5.5

The Boolean statement in an if-else is checked each time the program repeats the decision. However, the Boolean statement is not checked during the statements inside the curly braces following the if or else. Try out this code. In this code, the motor should move in one direction when the light sensor detects that it is dark and the other direction when it is bright. When you run this code, you will notice that the program does not respond quickly to a change in the amount of light. How can you modify this program to make it respond more quickly to a change in the value of the light sensor?

Module 6: Distance Sensor

The Hummingbird distance sensor is an infrared sensor. It emits infrared waves. If there is an object near the sensor, infrared waves bounce off the object and return to the sensor. The angle of reflection is used to measure how far away the object is.

Exercise 6.1

Attach the distance sensor to the Hummingbird board and print the value of the sensor to the screen.  How does the reading change as you move an object closer to the distance sensor?

Important Note: The distance sensor can detect objects roughly 8-100 cm from the sensor; it works best in the range of 20-60 cm.

Exercise 6.2

Write a program that turns on a vibration motor when an object is close to the distance sensor. Otherwise, the vibration motor should be off. How can you choose an appropriate threshold for the distance sensor?

An if-else statement uses a Boolean statement to choose one of two possibilities. You can also use Boolean statements in loops, as you have seen in the for loop. The for loop repeats the code inside the curly braces a certain number of times. A while loop, on the other hand, uses a Boolean statement to determine how many times the code inside the curly braces will be executed. The code inside the while statement will be repeated as long as the Boolean statement is true. When the Boolean statement is false, the program will move on to whatever block is below the while loop.

For example, the loop below will blink a tri-color LED as long as the value of sensor 1 is less than 500. When the value of the sensor is greater than or equal to 500, the LED will stop blinking and turn green.

You have now practiced using all the Hummingbird motors and lights, as well as three of the sensors. There are other sensors, including a temperature sensor and a sound sensor. These work very similarly to the sensors you have already used.

Exercise 6.3

Create an alarm to detect people (or cats) approaching your computer! When a someone is nearby, use lights and motors to alert you to their presence. The lights and movement should continue until you turn the knob sensor clockwise. You will need to reset the knob sensor to the counterclockwise position before using the alarm again.

Exercise 6.4

Create a simple version of whack-a-mole; an example is shown below. Use two servos as your “moles.” Each servo will correspond to one sensor: servo 1 to the distance sensor and servo 2 to the light sensor. The program should randomly select a 1 or 2 and then turn the appropriate servo to 90° to make the mole pop up. The mole should stay up until the user triggers the corresponding sensor. For example, the light sensor servo should stay at 90° until the user covers the sensor. Then the servo should move back to 0°. After the servo returns to 0°, add a random delay of 1-3 seconds before another mole pops up. After you have this basic game working, how can you add more moles? What other features can you add?

Congratulations! You have completed Hummingbird Arduino training. Have fun making robots!

Back to Top