

l Switching Modes
Switching Modes
We have created a simple utility, the Hummingbird Firmware Burner, for switching a Hummingbird Duo from one mode to another. For example, you might need to switch your Hummingbird from Arduino mode to Hummingbird (tethered) mode, or you might wish to switch the Duo to the bluetooth-ready mode so that you can use the BirdBlox app on an iPad.
Windows
Download and open the Windows installer file; follow the installer directions. On some computers, you may be asked to install Java. The most recent version is available here.
On Windows, you may need to install drivers for the Hummingbird’s bootloader. Download the Hummingbird driver installation program and run it once.
Mac
Download and open the Mac installer file; follow the installer directions.
Linux (Ubuntu)
Download and open the Linux Ubuntu or Other Linux installer file; follow the installer directions. On some computers, you may be asked to install Java. The most recent version is available here.
Video Tutorial
Use this video as a reference for using the Hummingbird Firmware Burner.
How to Use the Hummingbird Firmware Burner
1. For first time setup: >Follow the instructions to download and install the Hummingbird Firmware Burner.
2. Plug in your Hummingbird and then run the Hummingbird Firmware Burner application. You should see the following:
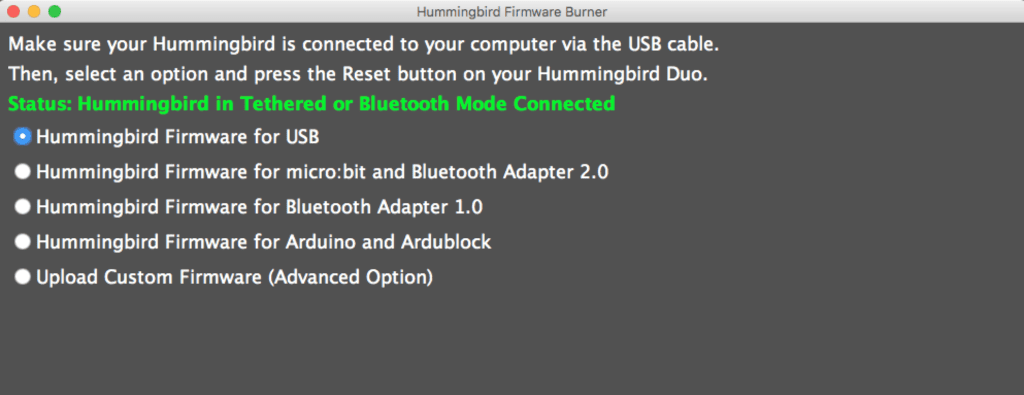
3. Select one of the four firmware options:
- Hummingbird Firmware for USB: This is the option that you should use with the CREATE Lab Visual Programmer, Scratch, Snap!, and other languages that require the Hummingbird to be tethered, or attached to the computer with the USB cable.
- Hummingbird Firmware for micro:bit and Bluetooth Adapter 2.0: This is the option that you should use if you want to use the Hummingbird BLE Adapter 2.0 with the BirdBlox app on a mobile device. This is also the option you should choose to use the micro:bit adapter. A picture of these accessories is shown in the Hummingbird Firmware Burner.
- Hummingbird Firmware for Bluetooth Adapter 1.0: This is the option that you will need to use the Hummingbird BLE Adapter 1.0 with the BirdBlox app on a mobile device. A picture of this adapter is shown in the Hummingbird Firmware Burner.
- Hummingbird Firmware Burner for Arduino and Ardublock: This is the option that you should use to write programs in the Arduino and Ardublock programming languages. The Hummingbird will need to be tethered to the computer when you upload a program. After you upload a program, you can disconnect the Hummingbird from the computer, and it will continue to run the program.
- Upload Custom Firmware (Advanced Option): This option will enable you to upload your own custom firmware.
For example, to switch the Hummingbird into the correct mode for the Bluetooth 2.0 adapter, you should select the second option.

4. Press the reset button on the Hummingbird Duo. The button is located next to the USB connector on the bottom side of the board.

5. Once reset is pressed, the firmware burner will load the program on the Hummingbird Duo. You should see status messages similar to those shown below:

6. Once the Duo is in the new mode, the Hummingbird Firmware Burner will pop up the following status message:
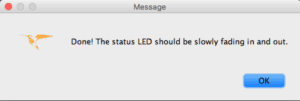
Once you hit OK the status message will change to something like this:
![]()
That’s it! If the Firmware Burner fails for any reason, try hitting the reset button on the Duo again – on some computers it may takes a few tries to upload.
Advanced Uses
The Hummingbird Firmware burner also provides a convenient way to load arbitrary firmware on the Hummingbird Duo. To use the firmware burner in this way, select “Upload Custom Firmware” and browse for a hex file:
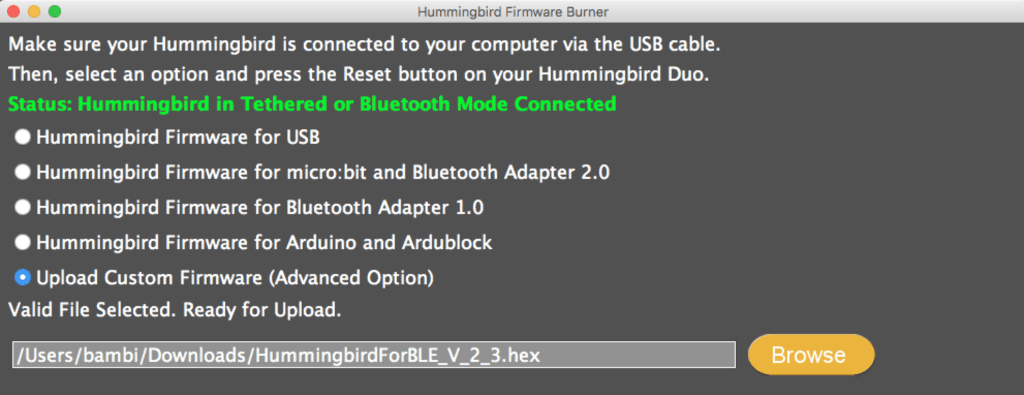
Simply press the reset button on Duo to upload the custom firmware.
Source Code
The Hummingbird Firmware Burner is released under the MIT license and full source can be checked out at our Github repo.
Troubleshooting
If the Firmware Burner is not working on Linux, try issuing the following command in a terminal window:
systemctl stop ModemManager.service