Register to receive free access to all teacher materials.

l Projects
Programming Language
Any language supported by Hummingbird Duo
Subjects
Maker Tools
Grades
9-12
Free Teacher Materials
Raspberry Pi is a line of $5 to $35 palm-sized Linux-ready embedded computer. Attach a keyboard, mouse, load an operating system on an SD card, attach a monitor, and you have a top of the line computer circa 2004. We’re interested in Raspberry Pi because:
- It’s a computer, so you should be able to hook it up to a Hummingbird or Finch and write code to control them.
- It’s a computer, so you can make it wirelessly connect to other computers and the internet.
- It’s a computer, and it’s small enough to fit under/on top of a Hummingbird.
- It’s a computer, and it’s $5 to $35!
At the moment, you can write code to control the Hummingbird in Java, Python, and Snap! (from a remote computer). The Raspberry Pi isn’t exactly plug and play; it requires a little bit of work to setup, and a little more work to talk with our robots. This tutorial guides you through setting up a Raspberry Pi, configuring Java, configuring our software libraries, and running our example files. If you’ve already got a Raspberry Pi, please keep in mind that our instructions and code use the default Raspbian OS.
Before You Begin
Before you start, you’ll need the following:
- A Raspberry Pi Model B or later
- A 4 GB or greater SD card. Some cards may not work, see this page for a selection of tested cards.
- A power source for the Raspberry Pi. If you plan to go mobile and want a battery, we recommend the Powergen PGMPP8400 or a similar battery. You may also use USB wall chargers to power your Raspberry Pi.
- If you want to make your creation entirely mobile, you can also power motors and servos with a Hummingbird battery pack.
- A USB wireless adapter. We use the Airlink101 AWL5088.
- A Hummingbird or Hummingbird Duo.
* – Some keyboards, hubs, and wi-fi adapters do not work with the Raspberry Pi. Check this list for a full listing of tested devices.
Installing an Operating System on the Raspberry Pi
There are numerous ways to install an operating system on the Raspberry Pi; you can even buy an SD card preloaded with an OS. See this page for an exhaustive listing of guides to install an OS. Our favorite installation method uses the Berryboot installer. To install via Berryboot, follow these steps:
- Before you begin, make sure you have an internet connection that the Raspberry Pi can access (Access to a wireless signal + a USB wireless adapter, or a router and an ethernet cable).
- Connect your SD card to a host computer; you may need a USB SD card reader.
- Download the zip file from the berryboot page, and extract its contents onto your SD card.
- Plug the SD card into your Raspberry Pi, plug in a keyboard, mouse, monitor, USB wireless or ethernet cable (if ethernet is available, it is less likely to cause problems than wireless).
- Power up your Raspberry Pi and watch it boot!
- Select your SD card as the destination drive. Typically it will be the first option and will have a prefix of “mm”.
- For Install operating system, choose the Debian Wheezy Raspbian option – the “offical” rPi Raspbian version.
- Twiddle your thumbs for a while as it downloads and installs.
- When it has installed, reboot the Raspberry Pi.
- The first time Raspbian boots, it will allow you to set some configuration options. We leave the defaults alone, but ensure that the ssh server is enabled as we typically run the Raspberry Pi via a remote terminal.
- Login with username “pi” and password “raspberry”
- Upgrade all the packages in the OS by typing “sudo apt-get update” and then “sudo apt-get upgrade”. These commands may take 10 minutes to an hour or so to complete, and are optional but recommended (you may also do them at a later time, or try them if things aren’t working).
Software for Remotely Connecting to the Raspberry Pi
Most people wish to run Raspberry Pi’s through a remote connection, dispensing with the need for a monitor, keyboard, and mouse, and making the Pi much more portable. In order to run the Raspberry Pi remotely, you will want:
- Software to determine the IP address remotely or admin access to a router to view the attached devices list
- An SSH client program so that you can run programs on the Raspberry Pi
- A file copy program so you can get software from the host
- Possibly a remote desktop so that you display and manipulate the Raspberry Pi’s desktop without a monitor.
Software to determine IP Address
We have used Advanced IP Scanner on Windows and Angry IP Scanner on Mac and Linux. They work reasonably well, though you may need to work out the IP address from the Mac address of your USB wireless module or from the ethernet port. Note that you may also simply be able to log into your router and view the attached devices list.
Terminal Software
Once you know the IP address, you can log into your Raspberry Pi using ssh client software. Our favorite is Putty in Windows; in Mac and Linux you can simply type “ssh username@host” in any terminal window; for example, “ssh pi@192.168.1.8”.
File Copy Software
To install Java or the BirdBrain Technologies software, it is easier to download the software to a host computer and then copy it over to the Raspberry Pi using file copy software. Our favorite is WinSCP in Windows, Cyberduck or Fugu on Mac. On Linux (and Mac) you can also use “scp username@host” from a terminal.
Remote Desktop Software
If you want to view the Raspberry Pi’s desktop from your host computer, you can use TightVNC. To get it, first ssh into your Raspberry Pi and issue the following command to install the program: “sudo apt-get install tightvncserver” Then whenever you wish to allow remote desktops, type “tightvncserver” The first time you run it, it will request you set up a password and other configuration options. Every time you run it you will see a message like: “New ‘X’ desktop is raspberrypi:1” Your Raspberry Pi is now broadcasting its desktop on the IP address of the pi:1. To view it, get a vnc viewer like the TightVNC viewer. When asked for the ip address, connect to the IP address of the Raspberry Pi appended by :1, or whatever number the message gave you when you ran tightvncserver.
Installing and Configuring Java
If you plan to compile and run Java or Snap! programs, you may need to install Java first. First check if java is installed by typing java -version at the command line. If you get a response, or if you’re using Python only you win! Skip directly to initial configuration for Hummingbird.
If you have an older system, follow these steps to install Java:
- Do a system wide update with sudo apt-get update
- Install Java with sudo apt-get install oracle-java7-jdk
If that doesn’t work, try the following instructions:
- Download Oracle’s Java JDK 8 for ARM to a host computer
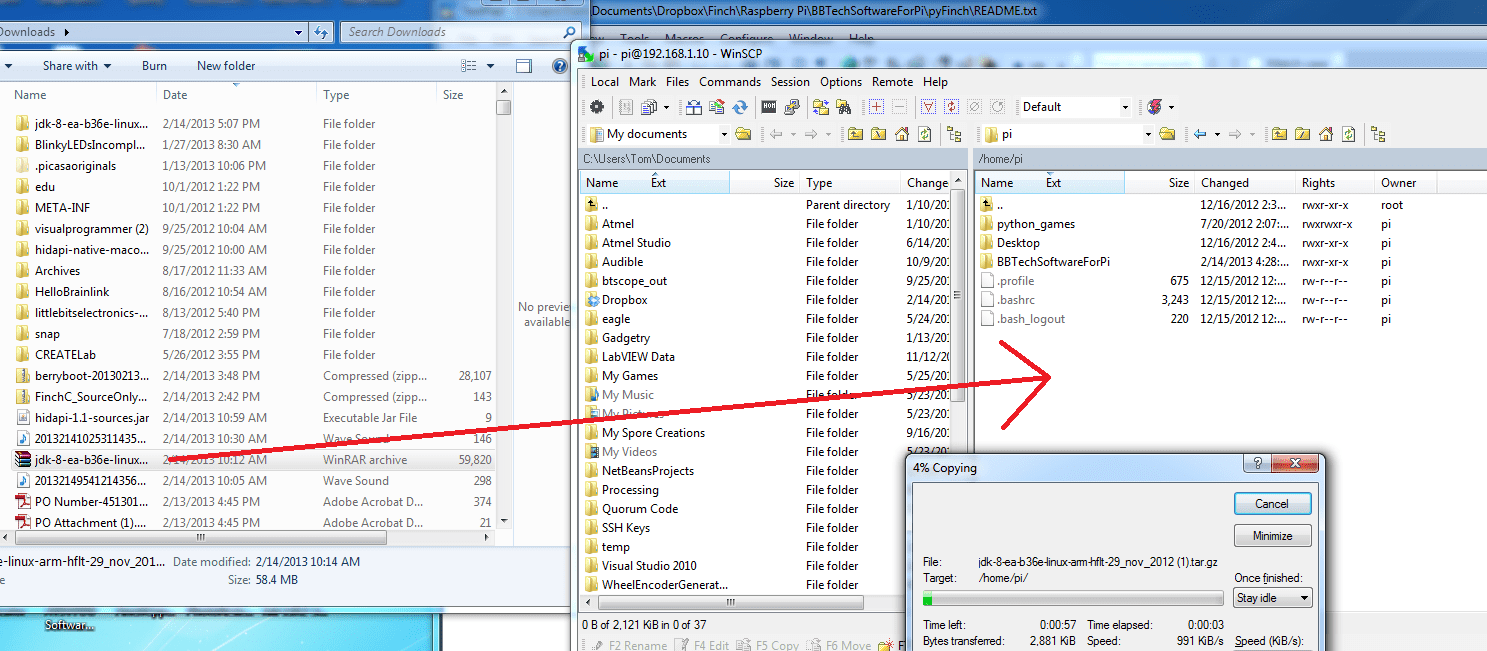
- Using a file copy program, Copy the file over to your Raspberry Pi’s default home/pi directory. (click for screenshot).
- Extract the files in the tarball with the following command – you may need to change the jdk name to the version you’ve downloaded:

- Move the JDK from your home directory to the /opt/ directory and delete the tarball to conserve space:

- Update the Java alternatives configuration:

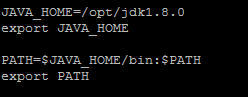
- Edit the file ~/.bashrc by typing “nano ~./bashrc” and place the following text at the end of the file:
- Type java -version and make sure your output matches the following, if you get an error, restart your Raspberry Pi and try again after restart:

Initial Configuration for Hummingbird
- On your host computer, download and unzip the BirdBrain Technologies Software for the Raspberry Pi.
- Copy the folder BBTechSoftwareForPi to your Raspberry Pi’s home directory (see screenshot for detail).
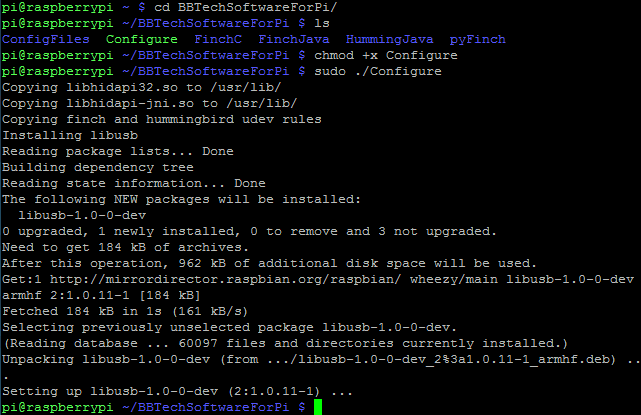
- Using a terminal, change directory to ~/BBTechSoftwareForPi
- Make the Configure script executable and then run it with sudo (“chmod +x Configure” followed by “sudo ./Configure”). You should see the following output:
Compiling and Running Java Programs for Hummingbird
To compile a Java program for Hummingbird, type javac -classpath :libs/hummingbird.jar FILEPATH For example, if you wish to compile KnobControlledOrbServo.java, you would use:![]()
To run a Java program for Hummingbird, type java -classpath libs/hummingbird.jar: FILEPATH For example, if you wish to run KnobControlledOrbServo, you would use:![]()
Compiling and Running Python Programs for Hummingbird
You can run python programs for the Hummingbird in two ways: You can compile and run a stand-alone python file, or you can run python in interpretative mode. To run a standalone file, simply type “python nameofstandalonefile.py”. Three examples are included. Alternatively, you can run Python in interpretative mode and issue commands from the Hummingbird. To do so, simply type “python”, and then in the resulting Python prompt, type “from hummingbird import Hummingbird”. Create a Hummingbird object to read sensors and set outputs by typing “hummingbirdObjectName = Hummingbird()”. See the following output for an example:
If you need to discover the names of functions for getting sensor values or setting outputs, type “help(Hummingbird).”
Compiling and Running Hummingbird Snap! Programs
We have created a server that allows you to control the Hummingbird with the Snap! programming environment from a remote computer. Snap! is an in-browser visual programming environment based on Scratch.
To use the Hummingbird Server, you may need to first install Java on your Raspberry Pi.
Unlike our other software distributions, in this case you have the option to create programs on a host computer as well as on your Pi. You will start a server program on the Raspberry Pi that will expose the Hummingbird’s outputs and sensors over HTTP. On a computer on the same local network, you can then create programs in Snap! using our specialized blocks library.
We attempted to use Snap! directly on the Raspberry Pi, and the model 2 and 3 Raspberry Pis work, but the original model B and the zero are simply too slow.
Step 1: Start the server on the Raspberry Pi. Navigate to the HummingbirdServer directory in BBTechSoftwareforPi folder and type “java -jar HummingbirdServer.jar. Assuming a Hummingbird is plugged in, you should see the following:
Step 2: Navigate to http://snap.berkeley.edu/snapsource/snap.html on a computer connected to the same local network as the Raspberry Pi.
Step 3: Import the HummingbirdSnapBlocks.xml file by dragging it from a file browser onto the Snap! webpage, or by clicking the file icon and selecting Import…
Step 4: Change the IP Address variable to the IP Address of the Raspberry Pi using the provided “set” block: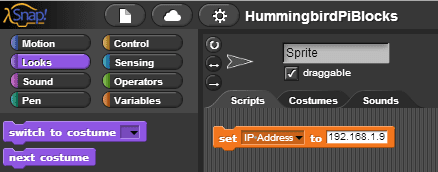
Note that the when you launched the server in step 1, the server IP address was printed in the terminal.
You are now ready to program the Hummingbird with Snap!.