Remote robots can be programmed by anyone with an internet connection. You can make a remote Finch Robot with:
NetsBlox
NetsBlox is built on the Snap! programming environment, and adds network capabilities that allow projects to send messages to one another. This is the key feature that makes remote robots possible.
To make a remote Finch Robot with NetsBlox, you will need:
- A Finch Robot. All generations of Finch will work.
- A Windows or Mac computer.
- One or more webcams to view the robot.
NetsBlox: Setup
NetsBlox is built on the Snap! programming environment, and adds network capabilities that allow projects to send messages to one another. This is the key feature that makes remote robots possible.
NetsBlox works best in Chrome. Please get the Chrome browser, then go to editor.netsblox.org. Create a NetsBlox account by clicking the cloud icon, and then login. Make sure you are logged in before you complete the rest of this tutorial.
You will need to save two NetsBlox files to your account:
- A server file, which you should run on a local laptop that is connected to a Finch robot.
- A client file, which is the file that people will use to remotely program your robot.
We have created starter client and server files that you can use. Please open the links to the files in Chrome; they may take up to 1 minute to load. If instead of loading the program, you get a blank gray or white screen, try the troubleshooting instructions in Step 3:
For Finch Robot 1:
For the new Finch Robot 2:
- Finch 2 server file for Finch A (needed if you have one or more Finch 2 robots)
- Finch 2 server file for Finch B (needed if you have two or three Finch 2 robots)
- Finch 2 server file for Finch C (needed if you have three Finch 2 robots)
- Finch 2 client file
You can connect up to three Finch 2 robots to one laptop. When you connect these robots to the BlueBird Connector, they will be assigned a letter (A, B, or C). To run three Finch 2 robots, make sure you are running the server files for Finch A, B, and C in separate browser windows. These windows must be at least partially visible (not minimized or fully behind other windows) to accept connections.
The rest of this section assumes you are familiar with programming the Finch robot in Snap!. If you are not, check out our excellent tutorials for Finch 1 and Finch 2.
Server file
- Make sure you are logged into NetsBlox by clicking the cloud icon – if you see “Login…” you are not logged in.
- Save the sample server file you opened to your account by clicking the file icon to the right of the the NetsBlox logo and selecting Save. DO NOT rename the file.
- Run the project by clicking the green flag and keep it visible in a browser window.
- Finch 1 Only: Take note of the variable value called myPublicID.
Client File
- Make sure you are logged into NetsBlox by clicking the cloud icon – if you see “Login…” you are not logged in.
- Finch 2 Only: Set the username variable to your NetsBlox userid. Make sure to keep the @ symbol. Press the space key once you have changed the username.
Finch 1 Only: Set the id variable in the client file to the value of your server file’s public role ID (which you noted in the last section). This is a unique identifier that every NetsBlox project has, and it is how the client project knows which server project to connect to. The public role ID should follow this pattern: myRole@yourprojectname@yourusername.
- Optionally, change the starter program (currently an obstacle avoider) or starter blocks.
- Save the client file to your account.
- Go to File icon->Open and select the name of the client file you just saved so that it is highlighted, then click “Share”.
- You can now share this file with your students by using the following link:
https://editor.netsblox.org/?action=present&Username=YOURUSERNAME&ProjectName=YOURPROJECTNAME&editMode=true&noRun
Make sure to change the username and project name in the above link. You can test it by opening the link in Chrome’s incognito mode.
Testing
To test your setup:
- Make sure to activate the server project by clicking the green flag and make sure to keep the browser tab with the server project at least partially visible. NetsBlox projects stop running if you go to a different tab or minimize the browser.
- Make sure to connect your robot(s) to the computer running the server project via the BlueBird Connector (Finch 2) or BirdBrain Robot Server (Finch 1).
- In a different browser window or on a different device, open the client project and hit c to connect. Try running the sample program or setting motors or LEDs.
NetsBlox: Using Remote Finch in an Online Class
Finch remote robots are best used in synchronous live online classes. Although it’s possible to set up a Finch in front of 24/7 webcam, this might be challenging to maintain as the Finch is mobile.
BirdBrain Technologies has started using remote robots, both Finch & Hummingbird, in many of our live classes. Watch this recording of one our first classes to use a remote robot for an example of how you can use remote robots live. Some considerations for using remote robots in live classes:
- As only one student can program a robot at a time, have multiple robots available for programming.
- Suggest to students that they assemble portions of their code while they wait for a chance to connect to the robot.
- Monitor to make sure no robots have been abandoned. A user can abandon a robot by connecting to it and then closing the browser window. The server file will still block other incoming connections unless you restart it by clicking the red stop button followed by the green flag.
- Use smartphones to create multiple camera views. Call in from both your laptop and from 1 or more smartphones to show the robots in different locations. You can even print a smartphone holder to place a phone on the robot itself.
- Consider creating a page or online document for your online class containing links to your Finch client file and directions. We have created an instructional page for our in-house classes; feel free to use the video or written instructions.
- Build a Finch pen or arena so your robots don’t wander off! A simple floor can be made from panels of inexpensive whiteboard material, and walls can be made of cardboard, pvc pipe, or wood.
NetsBlox: Troubleshooting
Files won’t load
The most common problem we’ve seen is that the links to the client and server files don’t load; instead you will see a white or dark grey blank page. If this happens, follow these steps to load a project:
- Open editor.netsblox.org in Chrome
- Download the appropriate xml files for your application:
- Open the File Icon and select import…
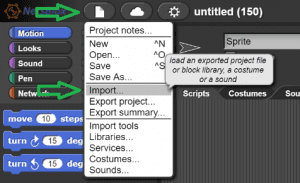
- Navigate to one of the project xml files you downloaded in step 2 and select the file.
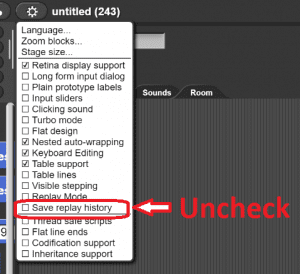
File loading errors are more frequent if the file being loaded is larger. One way to make your files smaller is to uncheck the “Save replay history” box in settings before you save:
If your students are also having trouble loading from a link, you can select “Export project” from the file menu and send them the xml file for the new client project you have made (after you’ve edited the client project). You do not need to send students the server project.
The robot is not responding
If you are connecting to the server from the client and the robot doesn’t seem to respond, make sure that:
- You are running the BlueBird Connector (Finch 2) or BirdBrain Robot Server (Finch 1) and it shows your Finch is connected.
- The browser window with the server project is not minimized. If you minimize a NetsBlox browser window, the code in the browser window stops running.
You get an error that you can’t send or receive messages because you are in collaboration mode
If you have the same server or client project opened twice, in two or more browser windows, while logged into the same NetsBlox account, then you might have accidentally opened the file in collaboration mode. Close all duplicate browser windows.
Python or Java
Your students can remotely and automatically run Python or Java code on the Finch Robot 2.0.
To make a remote Finch Robot with Java or Python, you will need:
- A Finch Robot 2.0.
- A Windows or Mac computer with Python version 3 or later or Java SDK version 8 or later installed such that it runs from the command line. Note: Your students can use any type of computer and do not need to install Python or Java on their computers.
- One or more webcams to view the robot.
- A shared networked folder, such as Dropbox or OneDrive.
- For Macs only: Install Homebrew. Once Homebrew is installed, open a terminal window and type brew install fswatch
Python/Java: Teacher Procedure
- Download this modified Python library or this modified Java library.
- Unzip it to a shared network folder.
- Start File Monitoring:
- Windows: Double click “runRemotePython.exe” for Python or “runRemoteJava.exe” for Java. It will open a command prompt. Leave this program running.
- Mac: Open a terminal window and navigate to the directory where the Python or Java library code is located. Then type ./runRemotePython.sh or ./runRemoteJava.sh to start file monitoring. Leave this terminal window open.
- Follow the standard instructions for Setting Up Your Finch (Python, Java) and Downloading Software (Python, Java) to get your Finches connected to your computer.
Python/Java: Student Procedure
- Write a program for the Finch.
- View the robot to make sure it is not currently moving or otherwise in use.
- Copy your program into the shared network folder your teacher sent you.
- The program will run within 15 seconds. Watch the camera view to see it run. If the program doesn’t run, you may have an error in your code. Open the file “YOURFILENAME_Log.txt” to view error messages.
Python/Java: Teacher Tips
- As only one student can program a robot at a time, have multiple robots available for programming.
- Use smartphones to create multiple camera views. Call in from both your laptop and from 1 or more smartphones to show the robots in different locations. You can even print a smartphone holder to place a phone on the robot itself.
- Build a Finch pen or arena so your robots don’t wander off! A simple floor can be made from panels of inexpensive whiteboard material, and walls can be made of cardboard, pvc pipe, or wood.
- Error and console output is logged to a file that students can view after their program is done running.
- You can have as many shared folders as you’d like – it is fine to have each student work within their own folder, but if you do, make sure you run the runRemote script in each shared folder.
- If using multiple robots per computer, the students will need to specify which robot they’re connecting to with their code (by using the letter A, B, or C when instantiating the Finch object).
- While students don’t need Python or Java on their computers, it might be faster for them to try compiling their programs locally to make sure all the syntax is correct, before copying the files to the shared network drive.
- There is one sample program, FinchTest, included in the default remote folder. You can edit this before sharing with your students to customize the sample program they start with.
- Student programs should be contained within a single .py or .java file.
- Students should not run their programs on their own computers – in fact, this will cause an error that the Finch is not connected.
- Programs that expect user input won’t work as there is no way to remotely send user input.
- Beware infinite loops: If a program is already running, and a new file is created in the same folder, then the new file will not run. This could be an issue if a student inadvertently creates an infinite loop, as the student won’t be able to kill or exit their program remotely and will need the teacher to do so using CTRL-C. If all students are working in the same folder, this will prevent any student from running new programs.
- If a student is editing a file in a text editor that autosaves after each change (even a single character addition/deletion) and they are doing so from the shared network drive, the runRemote program will try to run their file continuously. Ask the student to edit the file outside the network folder and then copy the file into the shared folder when they want to test it.
- Java only: The core Java files have been compiled with Java 8, but depending on your version of Java you may need to recompile them. To recompile, simply issue the following commands on the command line in the BirdBrainJava directory.
- javac Finch.java
- javac Hummingbird.java
- javac Robot.java
- javac Microbit.java
Python/Java: How it Works
The runRemotePython or runRemoteJava program checks about once per second to see if any files with .py or .java extensions have changed. If a file is changed or added to the folder, it will automatically compile and run the file. If a robot is connected and the program has no errors, the robot will run. In our tests with a shared Dropbox folder, syncing the file from a “student” computer to the “teacher” computer took only a few seconds.
Source Code
The runRemote programs are open source C# programs. Source is available on Github. They are based on when_changed, a generic script that monitors a folder and executes a command when a file is changed, developed by Ben Blamey.