Remote robots are robotics projects that can be programmed by anyone with an internet connection.
To make a remote Hummingbird Robot, you will need:
- A Hummingbird Robotics Kit. All generations of Hummingbird kits will work.
- A Windows or Mac computer.
- A webcam to view the robot.
- A 24/7 live stream (optional).
Step 1: Build and connect your robot
Gather arts & crafts materials and build anything that inspires you! Hummingbird kits are designed to provide maximum flexibility in what your final robot could look like. Check out our build, teach, and robotics at home pages for building tips and ideas. Some considerations specific to remote robots:
- Make sure that the moving parts can withstand continuous use if making a 24/7 live-stream robot.
- The Hummingbird Bit kits ship with a 4AA battery pack. Consider getting a power supply if you plan to make 24/7 live stream robot.
Once your robot is built, connect it to your computer:
Step 2: Make NetsBlox projects for your remote robot
We are using NetsBlox to program the robots. NetsBlox is built on the Snap! programming environment, and adds network capabilities that allow projects to send messages to one another. This is the key feature that makes remote robots possible.
Create a NetsBlox account by clicking the cloud icon at editor.netsblox.org:
- Write down the username and password your registered with.
- You will be sent a confirmation email with a temporary password.
- Go back to Netsblox, login in with that temporary password.
- Click on the cloud again to change your password to what you want.
You will need to create two NetsBlox files:
- A client file, which is the file that people will use to remotely program your robot.
- A server file, which you should run on a local laptop that is connected to a Hummingbird robot.
The rest of this section assumes you are familiar with programming the Hummingbird Bit in Snap!. If you are not, check out our excellent programming tutorial or follow our pre-recorded course. Make sure to work through the setup with bluetooth, single color LED, tri-color LED, position servo, and rotation servo sections.
We have created some general purpose starter files for any remote robot Hummingbird project. Please open these links in Chrome. If instead of loading the program, you get a blank gray or white screen, try the troubleshooting instructions in Step 4:
- Server project for Hummingbird Bit – click on “Stage” to see the code
- Server project for Hummingbird Duo or original Hummingbird – click on “Stage” to see the code
- Server for multiple robots (Hummingbird Bit only) – if you are using one laptop and connect 2 or 3 robots to the BlueBird connector via Bluetooth
- Client project for Hummingbird Bit
- Client project for Hummingbird Duo or original Hummingbird
As it’s also useful to have a worked example, here are the files used to control the Dragon robot:
To customize the generic remote robot Hummingbird files, you will need to make changes to both the client and server files.
2.1 Changes to server
- Make sure you are logged into NetsBlox by clicking the cloud icon – if you see “Login…” you are not logged in.
- Make it impossible to set outputs that are not connected to the Hummingbird controller. You can send back a friendly message to the client so that if the user tries to program an output that is not connected, they are notified of this. You can see how this is for the motor/rotation servo messages in the Dragon Server example. The bounds block also allows you to adjust the minimum and maximum port numbers based on what is actually connected to the Hummingbird controller.
- Bound any servos that you want to bound – for example, in the Dragon the jaw servo on port 1 is bounded to 65 to 102 because the robot would break if someone moved the servo beyond this range.
- Save the file:
- Save the file by clicking the file icon to the right of the NetsBlox logo.
- Save to the Cloud.
- Name the project appropriately – for example “DragonServer.”
- Write down this name somewhere.
- Run the file by clicking the Green Flag:
- You will see the background code in the Stage begin to glow.
- In the viewer window on the top right, you should also see the variable called “MyPublicID” change to match the title you gave your project.
Note: The server file allows only one client to take control at once, and gives that person 20 minutes to program before they are disconnected.
2.2 Changes to client
- Make sure you are logged into NetsBlox by clicking the cloud icon – if you see “Login…” you are not logged in.
- Set the id variable to the value of your server project’s public role ID. This is a unique identifier that every NetsBlox project has, and it is how the client project knows which server project to connect to. To find out what this magic value is, in the server project click on this block:

- Write down the public role ID from the server project and then in the client project call the set variable function and set the “id” variable to the value you just wrote down. The public role ID should follow this pattern: robot@yourprojectname@yourusername.
- Change the comment to tell people which outputs & sensors are hooked up and what their ranges are (example, position servo 1 moves the jaw, the range is 65-102).
- Change which blocks are already pulled into the workspace. You can also start people with a brief program or set of blocks to try.
- Save the File
- Save the file by clicking the file icon to the right of the NetsBlox logo.
- Save to the Cloud.
- Name the project appropriately – for example “DragonClient.”
- Write down this name somewhere.
- Go to the File icon->Open and select the name of the client you just saved so that it is highlighted, then click “Share”.
- You can now share this file by using the following link:
https://editor.netsblox.org/?action=present&Username=YOURUSERNAME&ProjectName=YOURPROJECTNAME&editMode=true&noRun
Make sure to change the username and project name in the above link. You can test it by opening the link in Chrome’s incognito mode. Here is an example link for the Dragon robot: https://editor.netsblox.org/?action=present&Username=captainled&ProjectName=Dragon&editMode=true&noRun
2.3 Test your client and server files
- Make sure your Hummingbird is connected to the Bluebird App or BirdBrain Robot Server.
- Open your Server file in your browser. Click the Green Flag to initiate the code.
- In a different browser window or on a different device, open the Client project.
- Resize your windows so that both Server and Client files can be active. NOTE: Netsblox projects stop running if their browser window is minimized or not visible, so make sure that at least a portion of the server project is visible on your screen.
- While your Client file is open:
- Hit the “c” key on your keyboard to connect.
- Try setting some of the outputs.
- Test that your servos are properly bounded by trying to set them outside their range.
2.4 Running the robot long-term
- Make sure your computer power settings do not turn off the screen or put it to sleep.
- Make sure that the server project browser window is open and visible on the screen.
- Keep the project away from cats, small children, and other chaos monkeys.
Step 3: Make the robot visible online
There are two ways to use remote robots – in live classes, and via live stream. If you program a remote robot while watching it in live class (via videoconferencing software like Zoom, Google Meet, etc.) the robot will respond to your commands almost instantaneously. However, if you program the robot while watching it on a livestream (Nest camera or similar), there is a delay of 5-30 seconds. Livestreams are designed to package video and allow hundreds of simultaneous viewers, but this creates inherent lag. Video conferencing software, on the other hand, was designed for a smaller number of people to interact in real time. Fewer people can participate, but the lag is not noticeable. It is up to you to decide which option is best for your remote robot! For more information, this article is helpful.
3.1 Remote Robots in Live Classes
BirdBrain Technologies has started using remote robots in many of our live classes. Watch this recording of one our first classes to use a remote robot for an example of how you can use remote robots live. This allows students who do not have access to a robotics kit to partake in programming a robot in real time. Some considerations for using remote robots in live classes:
- As only one student can program a robot at a time, have multiple robots available for programming.
- Suggest to students that they assemble portions of their code while they wait for a chance to connect to the robot.
3.2 Remote Robots in a live stream
There are several options for setting up a live stream. The solution used on the remote robots page is to purchase a Nest Cam and make it publicly viewable. This solution is easy to setup and does not have a monthly fee to maintain a continuous 24/7 public video feed. The main drawback is the initial price of the camera ($199). We are investigating alternate options that could use integrated laptop webcams.
3.2.1 Setting up a Nest Cam
Follow the instructions to connect the camera to your wifi network. There are two things you’ll want to do once the camera is set up:
- Activate Camera Sharing and create a public live camera feed. This is under “Camera Sharing” in the camera settings page, which is found by click the gear icon in the top right of the camera view. This will produce a link to your camera feed that you can share.
- Mute the microphone unless you’re comfortable with the internet hearing whatever goes on in your house. This is under “Device Options” in the camera settings.
3.2.2 Limited-time live-streaming: Youtube, Facebook, Twitch, and other providers
Another option for creating a live stream of your robots is to use a major streaming service such as Youtube, Facebook, or Twitch. These services are generally free to use and can make use of your laptop’s integrated webcam, and will allow you to live stream your robots for a limited period of time (12 hours for Youtube, 48 hours for Twitch, 8 hours for Facebook). We know of at least one person who starts a Youtube live stream for her students every morning that the students are working on their remote robots. Most of these streaming service providers have specific rules for content as well as for who is allowed to stream and they may also apply a waiting period before you can start your first stream. Specific instructions for how to live stream on each platform are readily available on those platforms and on other tutorials on the internet.
Step 4: Troubleshooting
4.1 Files won’t load
The most common problem we’ve seen is that the links to the client and server files don’t load; instead you will see a white or dark grey blank page. If this happens, follow these steps to load a project:
- Open editor.netsblox.org in Chrome
- Download the appropriate xml file for your application:
- Open the File Icon and select import…
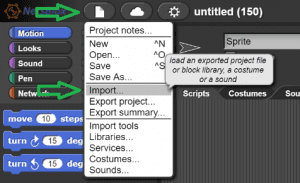
- Navigate to one of the project xml files you downloaded in step 2 and select the file.
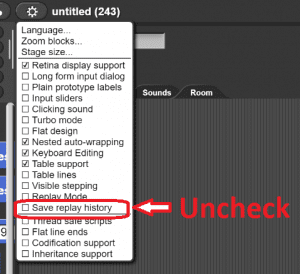
File loading errors are more frequent if the file being loaded is larger. One way to make your files smaller is to uncheck the “Save replay history” box in settings before you save:
4.2 The robot is not responding
If you are connecting to the server from the client and the robot doesn’t seem to respond, make sure that:
- You are running the BlueBird Connector/Connection App (Bit) or BirdBrain Robot Server (Duo) and it shows your Hummingbird is connected.
- The browser window with the server project is not minimized. If you minimize a NetsBlox browser window, the code in the browser window stops running.
4.3 You get an error that you can’t send or receive messages because you are in collaboration mode
If you have the server or client project opened twice, in two or more browser windows, while logged into the same NetsBlox account, then you might have accidentally opened the file in collaboration mode. Close all duplicate browser windows.
If you would like to share a remote robot you have created on the BirdBrain Technologies remote robots page, please let us know by emailing tom@birdbraintechnologies.com!